
We are going to create a simple but very impressive “2D Energy Explosion” effect in Unity using a Particle System. 🙂
Unity Tutorial Level: Beginner.
1.1 Creating a New Project.
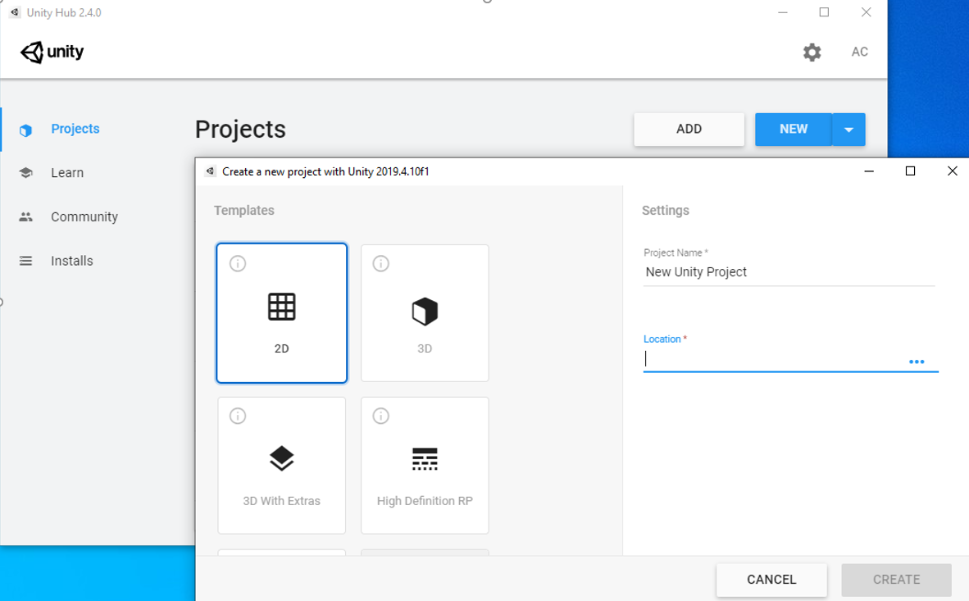
We are going to create a new project in Unity:
- Open Unity Hub in your PC.
- On the home screen, click on the “New” button .
- In the “Project name” field, type the name that you like the most for your project, we recommend “2D_VFX”.
- In the “Location” field, select where you want your project to be saved.
- Select the “2D” box.
- Click on “Create“.
1.2 Setting the environment.
As a highly recommended activity, we are going to create some folders that allow us to better manage all the files (know as “assets”) we are going to use to create our visual effects (creating folders so that in them we can place the different types of assets that we will use is a regular practice when working in Unity). So, let’s start!! 😀
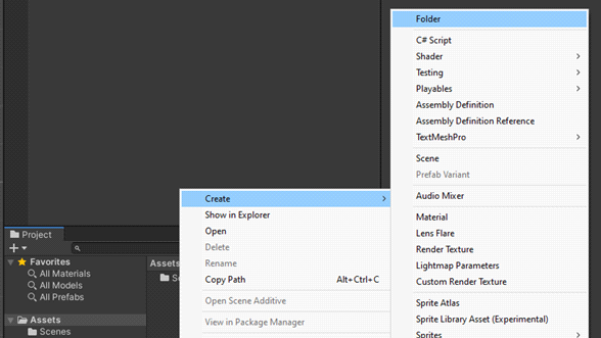
Once our new project is created, we will look inside it for the “Project” tab , and within it we right click on the “Assets” folder, this will display a menu of options from which we will choose “Create” and then “Folder“. This will create a new folder inside “Assets” which will we name it “Sprites“.
Repeat the previous steps to create another folder inside “Assets” but this time with the name of “Materials“.
In the “Sprites” folder, we are going to place the image files that we will take as a basis to create our visual effects and, in the “Materials” folder, we will place the “Mat” (o “Material”) type files that Unity uses to define the general characteristics that the images will have in our visual effects.


1.3 Uploading the “Sprite”.
To finalize the preparations we are going to load the image or “sprite” that we will use as the basis for our “2D Energy Explosion”.
To do this, the images we will use will be a “White Circle”, a “Luminous Point” and an “Energy Ray”, which we will later modify to create the desired explosion effect. You can download these images and use them, just right click on them and select “Save image as…”

White Circle with transparent background in “PNG” format, with size of “500 x 500 px”.
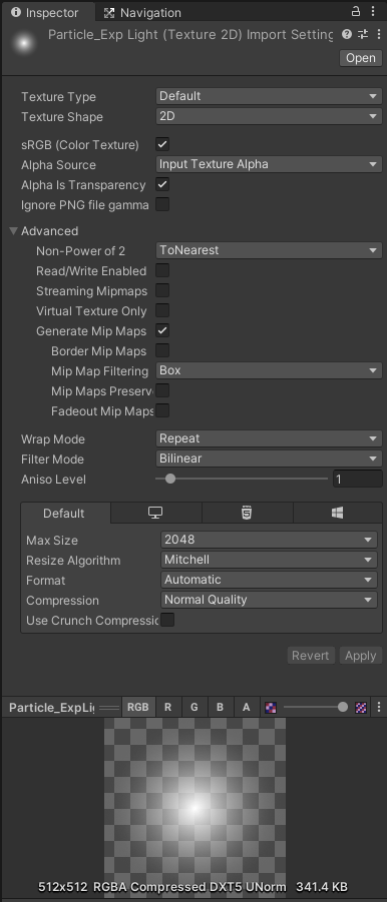
Luminous Point with transparent background in “PNG” format, with size of “520 x 520 px”

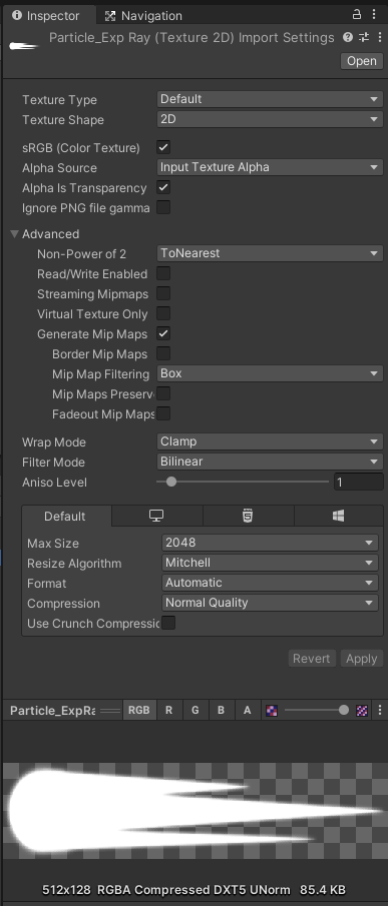
Energy Ray with transparent background in “PNG” format, with size of “524 x 108 px”
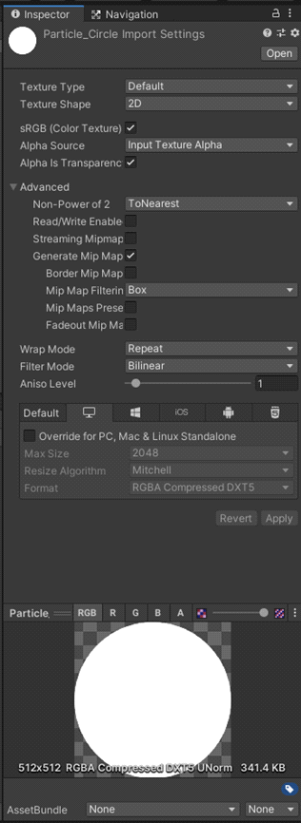
Once you’ve downloaded the images or created ones with the same features in your favorite design software, “drag and drop” each file into the “Sprites” folder you just created in Unity. Select each file and modify its properties as shown below (don’t forget to press “Apply” when finished so that the changes are saved).
2 Creating the material.
With our “sprites” ready in Unity, it is time to create the “materials” files that will be used to generate our special effect. As mentioned before, these “mat” or “materials” type files are used by Unity to define the base characteristics that the images that make up our special effect will have.
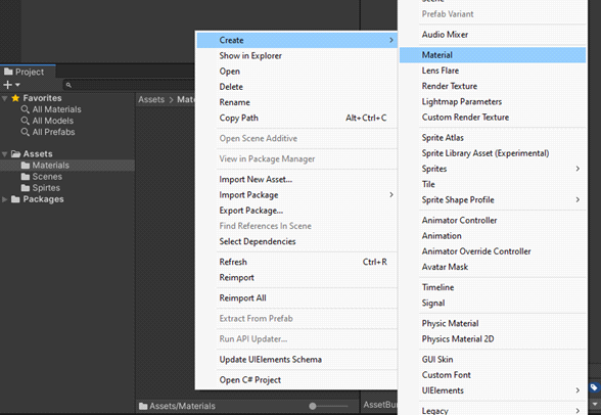
Let’s start by locating the “Material” folder that we did in the previous steps, right click on it and select “Create” and then “Material”.
We are going to name the file that has just been generated “ParticleMat_Circle”, select it and assign the following properties:
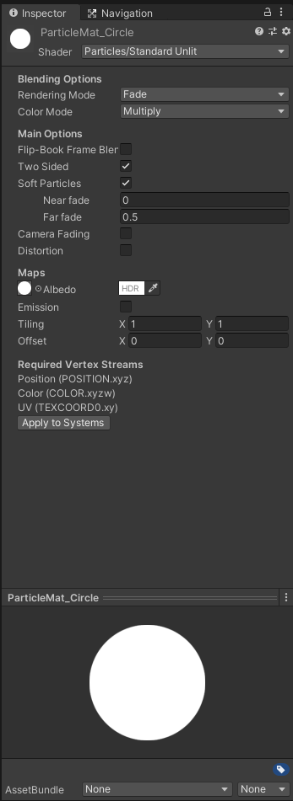
These properties define the type of “Shader” to use (a “shader” is an algorithm used to generate images with certain characteristics). Without delving too deeply into the subject, we can say that we will use an algorithm or “shader” to generate images used in particle systems (particle systems are responsible for generating a large number of simple and small images that we can use as special effects, for example, in explosions, flares, fog, etc.).
As our 2D Energy Blast is based on a particle system that uses small circles to create the effect of falling sparks, we need to define in our material the image that will be used to create the small sparks. To do this, in the properties of our material, in the “Maps” section we click on the small circle next to the word “Albedo”, by doing this a window will appear from where we can select our white circle “Sprite”.
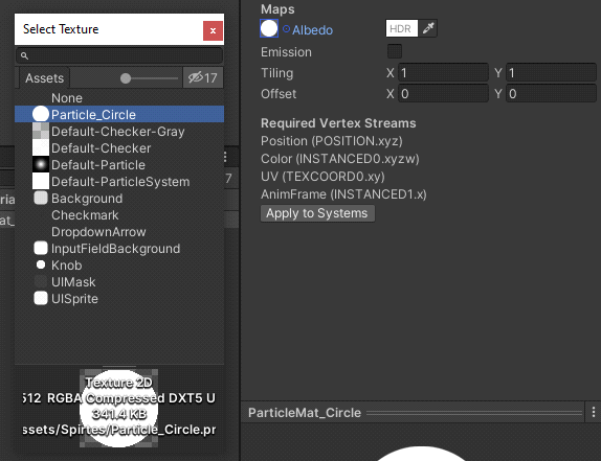
Once this is done, we click on “Apply to Systems” and we will have our first material ready that we will use to generate the explosion effect.
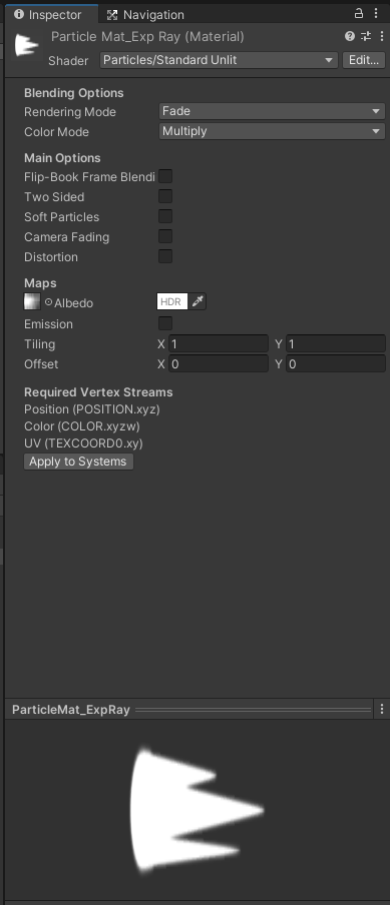
Now, let’s repeat the previous steps to create two more materials: “ParticleMat_ExpLight” and “ParticleMat_ExpRay”. Its characteristics will be the following:

3 Creating the particle system.
It’s time to create the particle system that will give life to our 2D Energy Explosion 😀
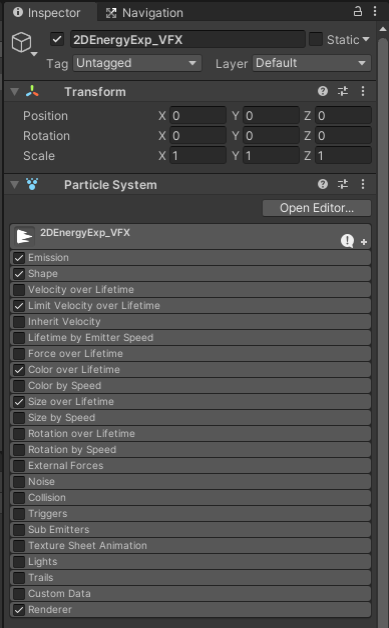
Let’s start by creating a game object in Unity or “Game Object”, for this it is necessary to go to the “Hierarchy” tab and within it in some empty place right click and choose “Create Empty”, with this an empty game object will be created which we will rename as “2DEnergyExp_VFX”.

Then, to add the particle system to our object, it is necessary to select it and press the “Add Component” button that appears below “Transform”, and from the list select “Effects” and then “Particle System”. With this we will have a particle system ready to use.
Our particle system is created, but before configuring it to create our effect, it is necessary to have only the “Emission”, “Shape”, “Limit Velocity over Lifetime”, “Color over Lifetime”, “Size over Lifetime” and “Renderer” boxes selected within it.
4 Creating “The 2D Energy Explosion” – PART I -.
It’s time to configure our particle system to create the 2D Energy Explosion effect we want.
Initially, when creating the particle system, Unity will show us in our project scene some magenta boxes that seem to appear from nowhere; This is the particle system in action, but since it doesn’t have a “Material” assigned to display, Unity generates these magenta frames to announce that there is no material or something is wrong with it. To change it, let’s do the following:
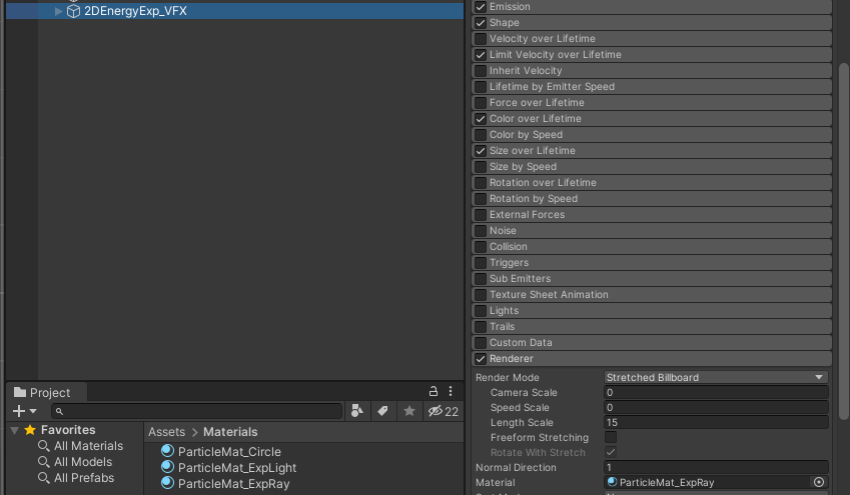
We select our object “2DEnergyExp_VFX”, then in its particle system we click on “Renderer” so that its options are displayed and we look for the one with the name “Material” (which at this moment should be empty). Now, what we need to do is drag our material file “ParticleMat_ExpRay” and drop it onto the box in front of “Material” so that it is assigned as the image to be displayed in the particle system (replacing the magenta boxes with white rays).
Once this is done, we click on “Renderer” again to collapse it; we will return to him later 🙂
Now, within the particle system we click on the text “2DEnergyExp_VFX” (this text has the same name as our game object) and with this the general options to configure the system will be displayed. These options must be modified to be as follows:
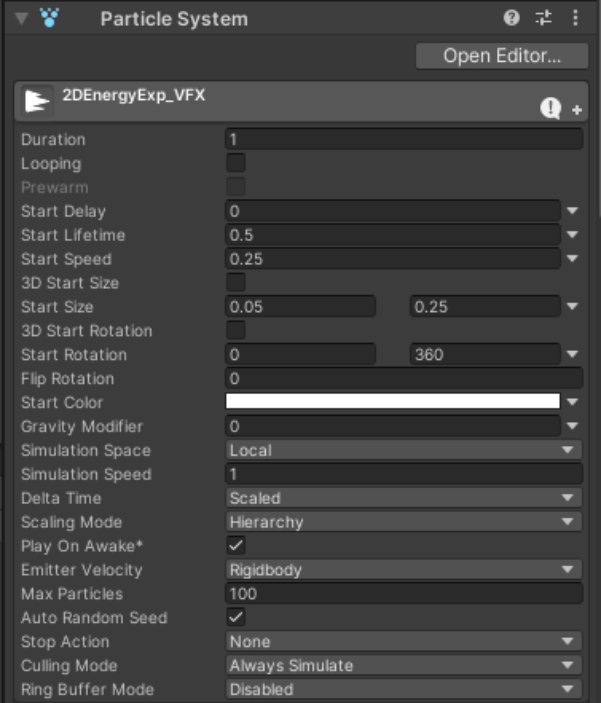
The values shown here are those necessary to create a 2D Energy Explosion effect as shown in the example video in this tutorial, but you can create your own effects by modifying any of the properties of the particle systems.
Notes for the exercises.
Once this tutorial is completed, we recommend creating new effects by modifying the following parameters:
Start Lifetime: To modify the duration of each particle.
Start Speed: To modify the speed with which the particles are fired.
Start Size: To modify the initial size with which the particles will be created.
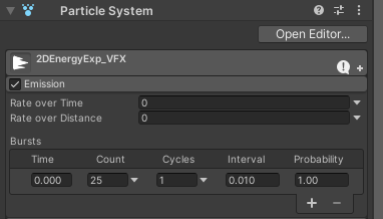
Now let’s go to the “Emission” section, here we will define the exact number of particles that we want to be generated during the lifetime of our effect (in this case we are only going to generate 25 particles “once”).
Notes for the exercises.
Once this tutorial is completed, we recommend creating new effects by modifying the following parameters:
Count: To modify the number of particles to generate.
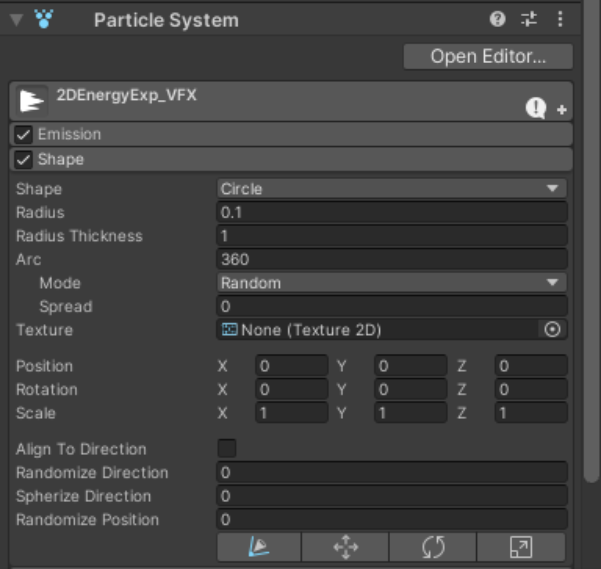
In the “Shape” section we will see the way in which we want our particles to be projected, in this case, we want the particles to be generated around a circle in random positions..
Notes for the exercises.
Once this tutorial is completed, we recommend creating new effects by modifying the following parameters:
Radius: To modify the size of the circle from which the particles are fired.
Mode: To modify the pattern in which the particles are fired.
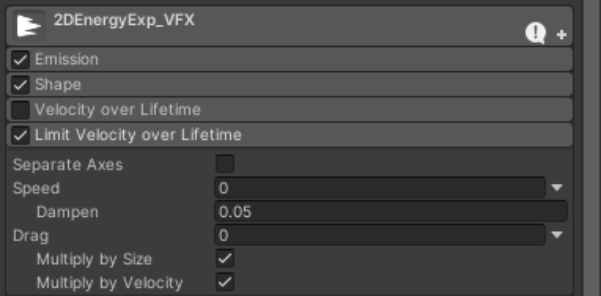
In the “Limit Velocity over Lifetime” section we are going to modify the way in which our particles are fired in such a way that they present a slight deceleration at the end of their trajectory.
Notes for the exercises.
Once this tutorial is completed, we recommend creating new effects by modifying the following parameters:
Dampen: To modify the deceleration when particles are fired.
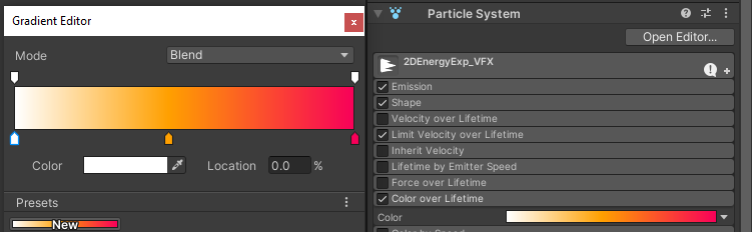
In the “Color over Lifetime” section we will make our particles change color when they reach the end of their life time. To do this we will modify the “Color” box by clicking on it and entering the gradient editor “Gradient Editor”.
Notes for the exercises.
Once this tutorial is completed, we recommend creating new effects by modifying the following parameters:
The flags at the top of the rectangle modify the percentage of transparency that all particles will have (you can create more by clicking on this area).
The flags at the bottom of the rectangle modify the color of all the particles (you can create more by clicking in this area).
The position of the flags on the horizontal axis determines when, with respect to the total lifetime of the particle, the required color and transparency characteristic will be applied.
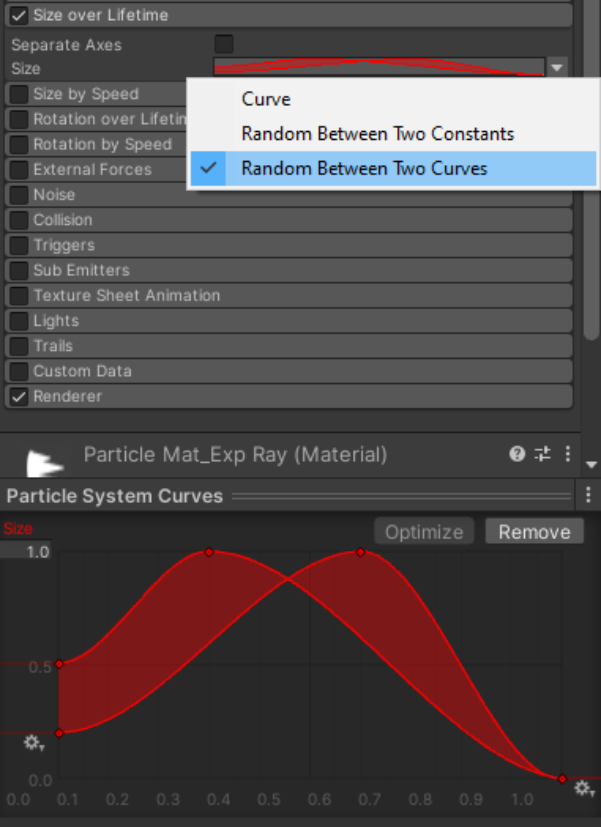
In the “Size over Lifetime” section we are going to modify the size behavior that our particles will have so that they start small, then grow to a normal size (the one previously assigned in “Start Sizes”), and then shrink.
We are going to define the size behavior using two graphs; To access them we are going to click on the small arrow next to the “mini” graphic in front of the “Size” box and we will choose the “Random Between Two Curves” option.
Then, in the “Size” box we will click on the “mini” graph in front of it, by doing so, at the bottom of the “Inspector” tab the complete graph will be displayed with the title “Particle System Curves”; Here the two graphs will be shown and we can modify them as shown below.
Notes for the exercises.
Once this tutorial is completed, we recommend creating new effects by modifying the following parameters:
Modify the curves so that you obtain different behavior in the sizes of the particles.
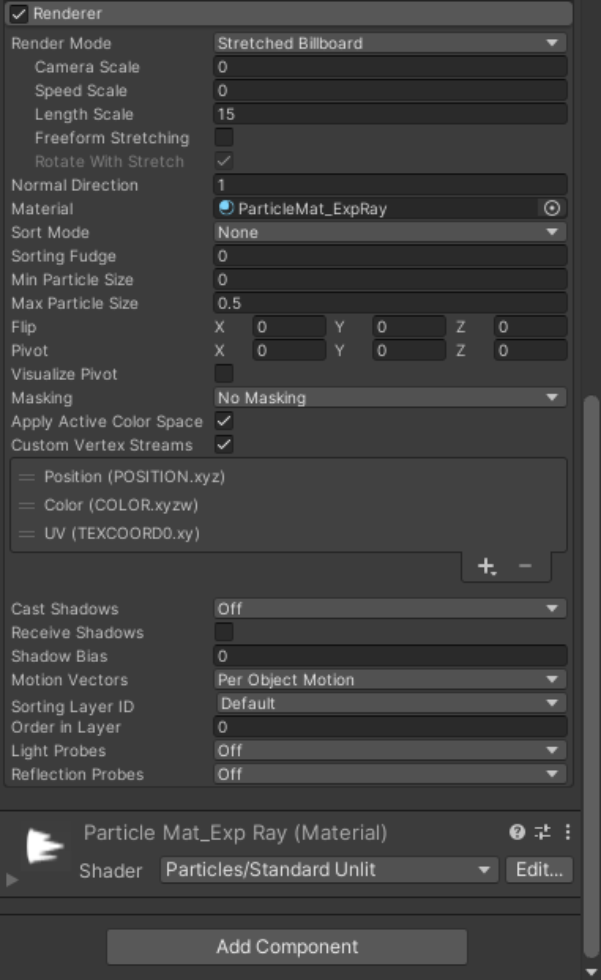
The last section to modify is “Renderer” and this defines the characteristics that our particles will have when they are displayed on the screen.
Notes for the exercises.
Once this tutorial is completed, we recommend creating new effects by modifying the following parameters:
Length Scale: To modify the length of our particle in relation to its width.
5 Creating “The 2D Energy Explosion” – PART II -.
Yes, this will be a long tutorial, but it’s worth it, we promise 🙂
When it comes to special effects, it is advisable to use two or more particle systems to add details that make our effects look better; and this time will not be the exception 😀
In addition to the energy explosion we made in the previous point, now we are going to add a “glow” effect that will give more life to the explosion.
Let’s start by selecting our object “2DEnergyExp_VFX” and repeating the previous steps, we are going to create within it two new empty objects with the names “EnergyExp_Light” and “EnergyExp_Spark”.
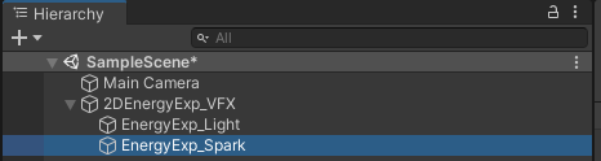
As a next step, we are going to add a particle system to each of these new objects
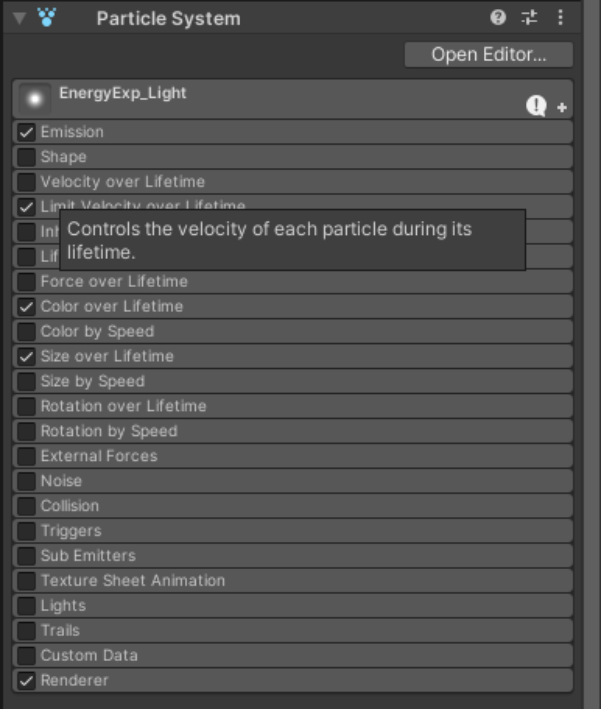
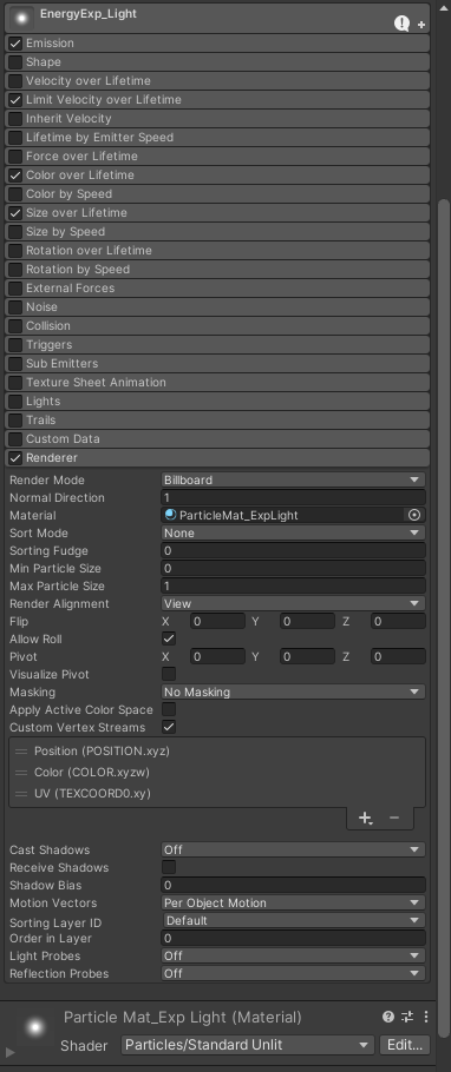
We select our “EnergyExp_Light” object and make sure that its particle system should only have the “Emission”, “Limit Velocity over Lifetime”, “Color over Lifetime”, “Size over Lifetime” and “Renderer” boxes selected within it.
Then in the particle system we click on “Renderer” so that its options are displayed and we look for the one with the name “Material” (which at this moment should be empty). Now, what we need to do is drag our material file “ParticleMat_ExpLight” and drop it on the box in front of “Material” so that it is assigned as the image to be displayed in the particle system (replacing the magenta boxes with white light points).
Once this is done, click on “Renderer” again to collapse it.
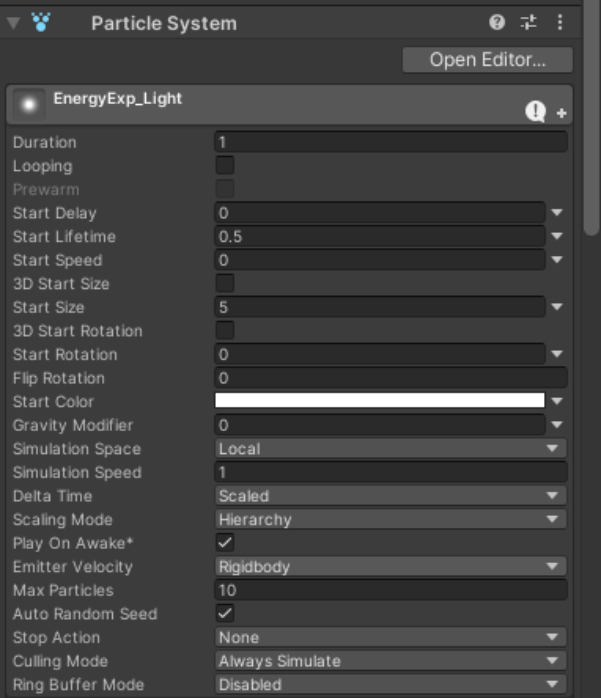
Now, within the particle system we click on the text “EnergyExp_Light” (this text has the same name as our game object) and with this the general options to configure the system will be displayed. These options must be modified to be as follows:
Notes for the exercises.
Once this tutorial is completed, we recommend creating new effects by modifying the following parameters:
Start Lifetime: To modify the duration of each particle.
Start Speed: To modify the speed with which the particles are fired.
Start Size: To modify the initial size with which the particles will be created.
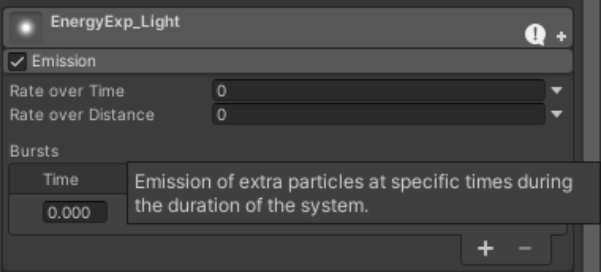
Now let’s go to the “Emission” section, here we will define the exact number of particles that we want to be generated during the lifetime of our effect (in this case we are only going to generate a particle “only once”).
Notes for the exercises.
Once this tutorial is completed, we recommend creating new effects by modifying the following parameters:
Count: To modify the number of particles to generate.
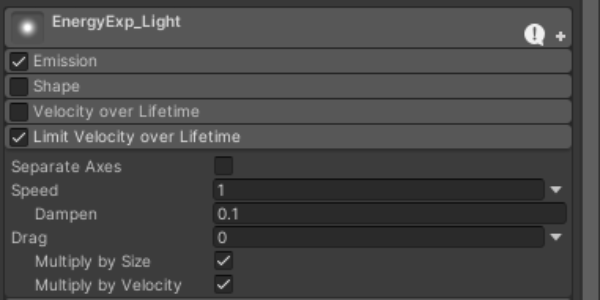
In the “Limit Velocity over Lifetime” section we are going to modify the way in which our particles are fired in such a way that they present a slight deceleration at the end of their trajectory.
Notes for the exercises.
Once this tutorial is completed, we recommend creating new effects by modifying the following parameters:
Dampen: To modify the deceleration when particles are fired.
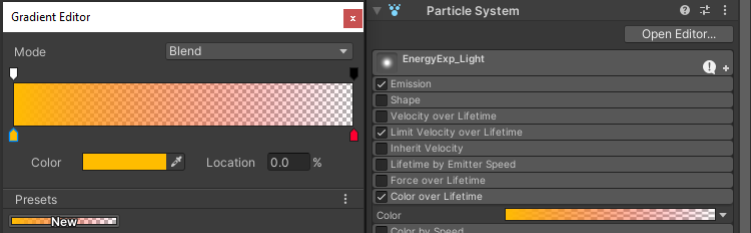
In the “Color over Lifetime” section we will make our particles perform two actions: the first is that they change color when they reach the end of their life time and the second is that they also disappear. To do this we will modify the “Color” box by clicking on it and entering the gradient editor “Gradient Editor”.
Notes for the exercises.
Once this tutorial is completed, we recommend creating new effects by modifying the following parameters:
The flags at the top of the rectangle modify the percentage of transparency that all particles will have (you can create more by clicking on this area).
The flags at the bottom of the rectangle modify the color of all the particles (you can create more by clicking in this area).
The position of the flags on the horizontal axis determines when, with respect to the total lifetime of the particle, the required color and transparency characteristic will be applied.
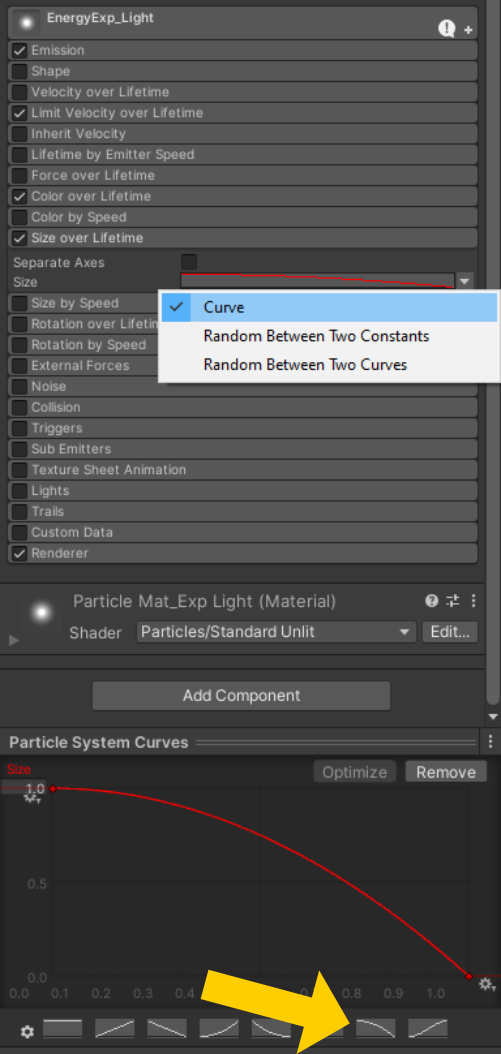
In the “Size over Lifetime” section we are going to modify the behavior of the size that our particles will have so that they start with a normal size (the one previously assigned in “Start Sizes”), and then become smaller.
We are going to define the behavior of the size using standard graphs; To access them we are going to click on the small arrow next to the “mini” graph in front of the “Size” box and choose the “Curve” option.
Then, in the “Size” box we will click on the “mini” graph in front of it, by doing so, at the bottom of the “Inspector” tab the complete graph will be displayed with the title “Particle System Curves”; we will modify it as shown below.
Notes for the exercises.
Once this tutorial is completed, we recommend creating new effects by modifying the following parameters:
Modify the curves so that you obtain different behavior in the sizes of the particles.
The last section to modify is “Renderer” and this defines the characteristics that our particles will have when they are displayed on the screen.
6 Creating “The 2D Energy Explosion” – PART III -.
This is the last, we also promise 🙂
Now we are going to add a “sparks” effect to our explosion (because every explosion must always have some).
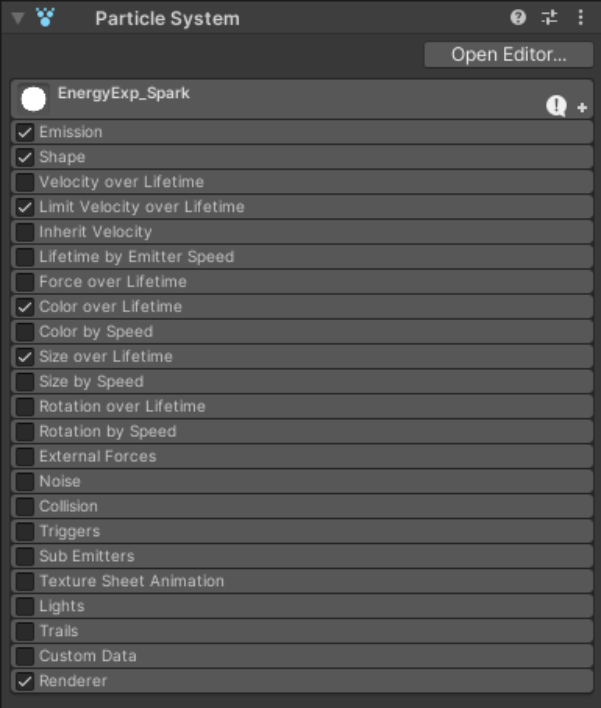
We select our “EnergyExp_Spark” object and make sure that its particle system should only have the “Emission”, “Shape”, “Limit Velocity over Lifetime”, “Color over Lifetime”, “Size over Lifetime” and “Renderer” boxes selected within it.
Then in the particle system we click on “Renderer” so that its options are displayed and we look for the one with the name “Material” (which at this moment should be empty). Now, what we need to do is drag our “ParticleMat_Circle” material file and drop it onto the box in front of “Material” so that it is assigned as the image to be displayed in the particle system (replacing the magenta boxes with white circles).
Once this is done, click on “Renderer” again to collapse it.
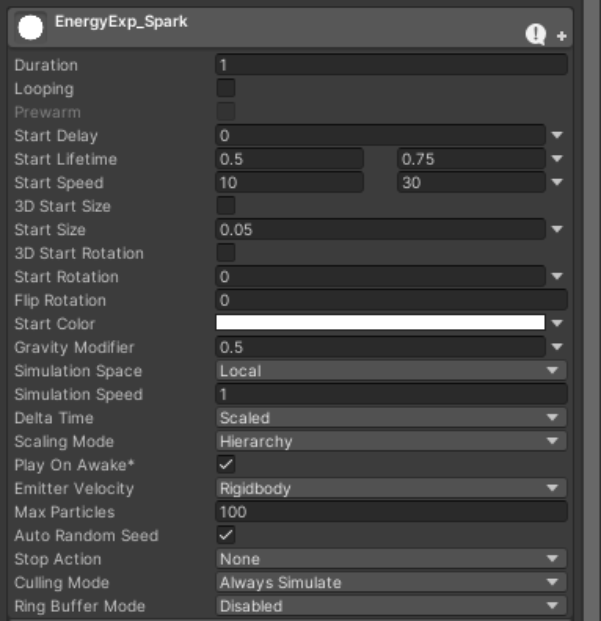
Now, within the particle system we click on the text “EnergyExp_Spark” (this text has the same name as our game object) and with this the general options to configure the system will be displayed. These options must be modified to be as follows:
Notes for the exercises.
Once this tutorial is completed, we recommend creating new effects by modifying the following parameters:
Start Lifetime: To modify the duration of each particle.
Start Speed: To modify the speed with which the particles are fired.
Start Size: To modify the initial size with which the particles will be created.
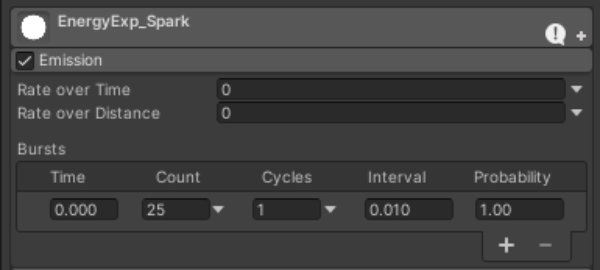
Now let’s go to the “Emission” section, here we will define the exact number of particles that we want to be generated during the lifetime of our effect (in this case we are only going to generate 25 particles “once”).
Notes for the exercises.
Once this tutorial is completed, we recommend creating new effects by modifying the following parameters:
Count: To modify the number of particles to generate.
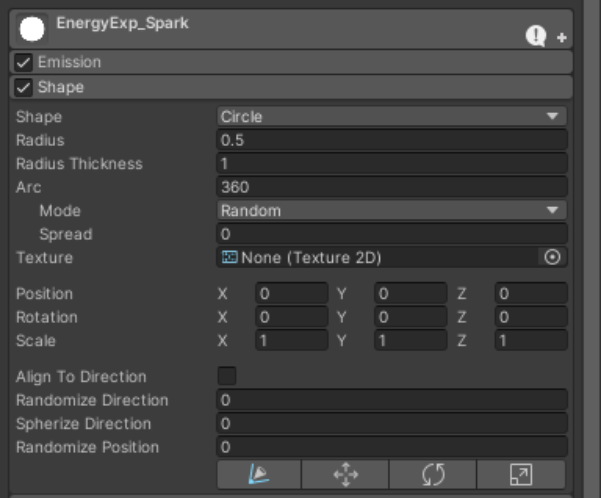
In the “Shape” section we will see the way in which we want our particles to be projected, in this case, we want the particles to be generated around a circle in random positions.
Notes for the exercises.
Once this tutorial is completed, we recommend creating new effects by modifying the following parameters:
Radius: To modify the size of the circle from which the particles are fired.
Mode: To modify the pattern in which the particles are fired.
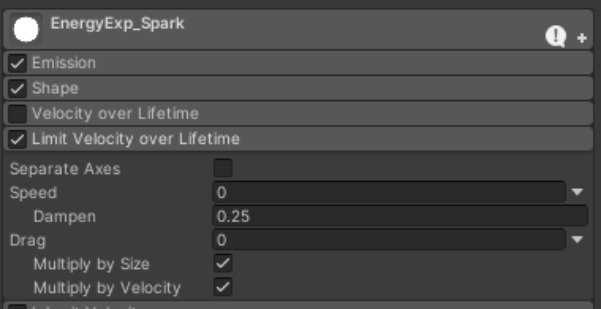
In the “Limit Velocity over Lifetime” section we are going to modify the way in which our particles are fired in such a way that they present a slight deceleration at the end of their trajectory.
Notes for the exercises.
Once this tutorial is completed, we recommend creating new effects by modifying the following parameters:
Dampen: To modify the deceleration when particles are fired.
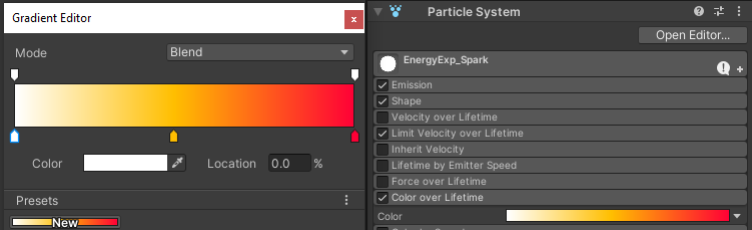
In the “Color over Lifetime” section we will make our particles change color when they reach the end of their life time. To do this we will modify the “Color” box by clicking on it and entering the gradient editor “Gradient Editor”.
Notes for the exercises.
Once this tutorial is completed, we recommend creating new effects by modifying the following parameters:
The flags at the top of the rectangle modify the percentage of transparency that all particles will have (you can create more by clicking on this area).
The flags at the bottom of the rectangle modify the color of all the particles (you can create more by clicking in this area).
The position of the flags on the horizontal axis determines when, with respect to the total lifetime of the particle, the required color and transparency characteristic will be applied.
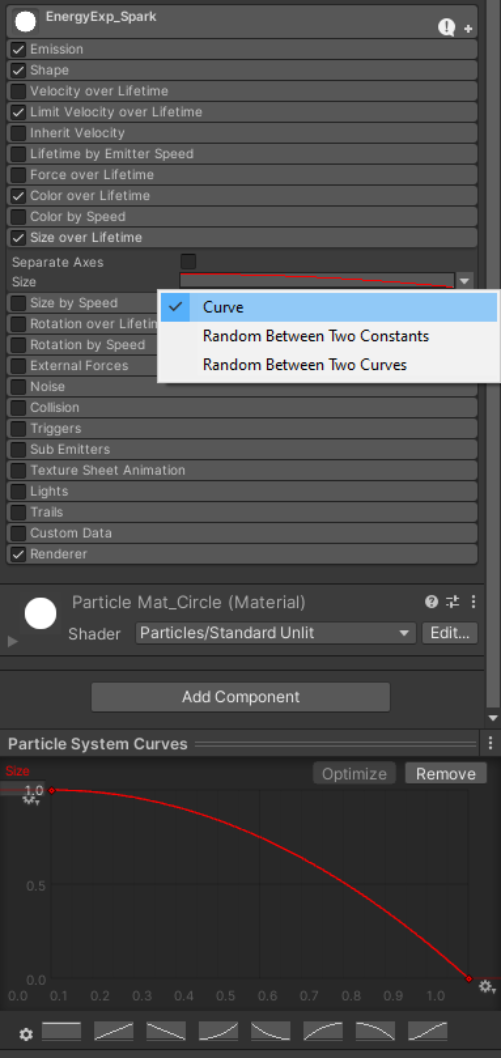
In the “Size over Lifetime” section we are going to modify the behavior of the size that our particles will have so that they start with a normal size (the one previously assigned in “Start Sizes”), and then become smaller.
We are going to define the behavior of the size using standard graphs; To access them we are going to click on the small arrow next to the “mini” graph in front of the “Size” box and choose the “Curve” option.
Then, in the “Size” box we will click on the “mini” graph in front of it, by doing so, at the bottom of the “Inspector” tab the complete graph will be displayed with the title “Particle System Curves”; we will modify it as shown below.
Notes for the exercises.
Once this tutorial is completed, we recommend creating new effects by modifying the following parameters:
Modify the curves so that you obtain different behavior in the sizes of the particles.
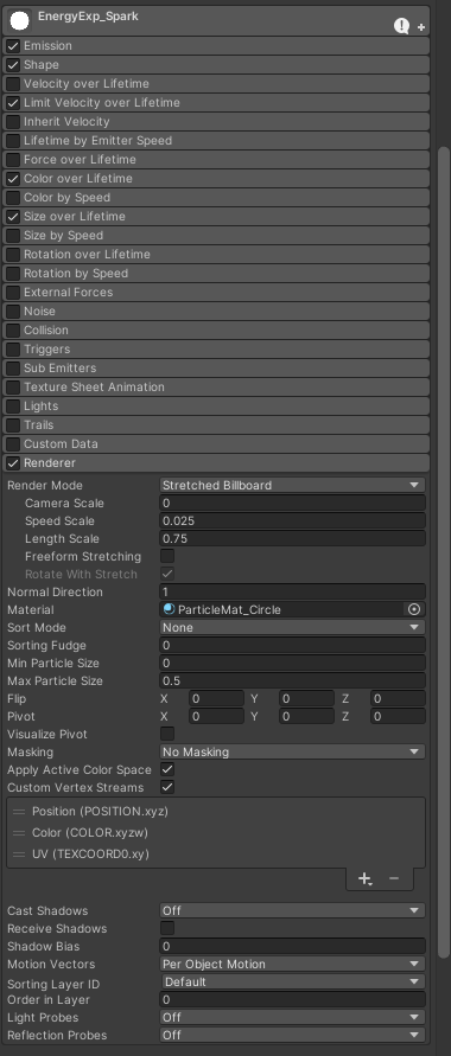
The last section to modify is “Renderer” and this defines the characteristics that our particles will have when they are displayed on the screen.
Notes for the exercises.
Once this tutorial is completed, we recommend creating new effects by modifying the following parameters:
Length Scale: To modify the length of our particle in relation to its width.